A world-class, localised product starts with great collaboration. Here’s how to optimise your process and design files for excellent localisation.
Localisation in Figma
Figma plays a central role in product localisation workflows. The Localisation Team uses it regularly to do these things:
1. Understand context
We often look at designs to understand the flow, visual form, and placement of what's being localised. Freelancers might also need access to design files for the same purpose. So, please ensure Localisation Managers have edit access to your design file so we can share it with anyone necessary.
2. Create translation keys
Localisation Managers create keys based on Figma designs. Keys are unique identifiers that reference pieces of text that have multiple variations. They allow strings that need translation to be easily swapped out based on language instead of being hardcoded. We do this is by updating the text layer with the key name. The design content becomes the key value so it can pull content in from Phrase. Once the strings are complete in Phrase, we might need to update the value for various reasons. A few reasons are that we might need to replace static content with a placeholder or enable pluralisation. Learn more about keys here and learn more about Phrase Strings here.
3. Do quality assurance (QA)
Once the translations are done in Phrase, they get pulled back into Figma to visualise the localised designs. To do this we…
- Create a new page in the Figma file. This way the original design isn’t edited.
- Connect the content with the keys. This is done for both the new and existing content.
- Pull in the translations. Localised content populates the design in Figma with the strings in Phrase via the keys (based on the key names).
- Make adjustments. We then refine the content and/or design based on the context. At this point, we might reach out to a designer if we notice anything with the design that might cause localisation issues.
4. Export screenshots
Local markets and/or central marketing teams use localised designs to understand how the product looks and works in their language. They might also export localised screens to use in marketing materials.
Collaboration workflow
Design tips
To make designs localisation-ready, follow these useful tips:
Design flexible UI
Some languages use 30–40% more or less characters than English to say the same thing. So, your designs need to scale. You can use pseudo translations to see if the interface gracefully handles different content lengths.
Be culturally sensitive
We operate in many markets, and the each have their own unique culture. Some countries are sensitive to different things such as LGBTQ+ content, feminine hygiene, pork, and alcohol. So, please consider user religion, culture, and tradition when making screens and prototypes.
Use generic content
Your screens might be used in various external materials such as help centre articles, landing pages, or launch emails. When possible, please don't use actual restaurant names and copyrighted imagery. Instead, opt for generic content that can be repurposed for different contexts.
Quality assurance
Always test to ensure your design works well in all languages. You can do this early in your process with pseudo-translation.
Pseudo-translation
This is a lightweight translation used to test if something works in another language. For example, if we launched the app in Japanese, it could be tested with pseudo-translation without a large investment. You can pseudo-translate your designs with the Pseudoloc plugin in Figma.
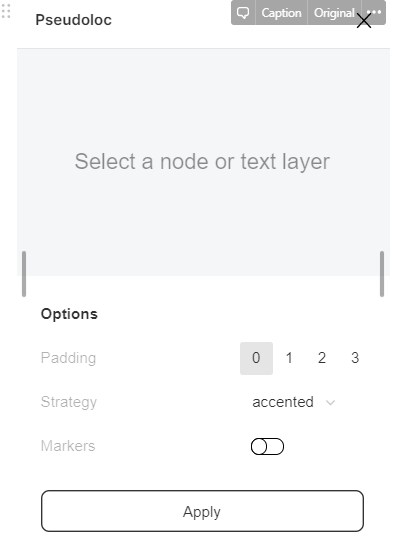
How to use Pseudoloc
- Download the Pseudoloc plugin here
- Duplicate the frame, page, or whatever you want to test
- Select what you want to test and open the plugin
- Choose your settings and click "apply" as shown below